- سبدخرید خالی است.
- ادامه خرید
Metamask: Metamask show Select your account dialog
- نوشته شده در
 بامیلو
- 0
- دسته بندی ها : CRYPTOCURRENCY
Title: Introduction of Metamask: A Powerful Tool for Safe Web3 Letter Pockets
Introduction
When the world becomes more digital, online transactions become an essential part of our daily life. However, there is great responsibility with great power, and safe wallets protected the user funds from potential theats of crucial importance. In
Why metamasking?
Metamask is one of the most frequently used web3 money Exchanges know for its simplicity and user -friendliness. Its open source code ensures maximum transparency and enables development to build it up without ensuring security concerns. Ethereum, Binance and More, Binance and More,
How to IntEGrate Metamask Into Your WebSite
To intEe Metamask into your website, you must follow the following steps:
- Select a Web3 Wallet Provider : For this article we will concentrate on the latter.
- Set up the metamask -api
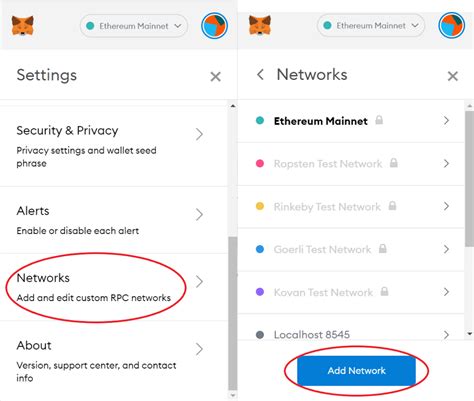
: register in your metamask account and navigate to the “Settings” side. Click on “Arbeitschen & Konten” and then click on the three vertical points next to your got -on pocket name. Select “API Access” and create an api key.
- Create a Web3 Wallet : Supported by the Metamask Library.
- Setting up the dialog box : as you have created web3 wallet, you must set up the “Select your account” dialog box. .
Select the Dialogy of Your Account
“Add more Wallet” button, it will be displayed with a dialog box “select your account”. In this dialogue:
* Betting Male Name : A Dropdown List of the Available Metamask Money Exchanges.
* Address : The Item Address linked with this account.
* Name : Optionally, you can add a custom name for the selected wallet.
Example Code
Here is an example -code -snippet in Javascript, which demonstrates how a web3 wallet object is created and the dialog box “select your account” is set up:
`JavaScript
// Import the Metamask Library
Const metamask = window.metamask;
// SET UP The Web3 Wallet Object
Const Walletobject = New Metamask.web3wallet ({{{{
Provider: ‘ ,,
});
// SET UP THE BOX OF YOUR ACCOUNT DIALOG
Function Selectaccount (Wallet Name) {
Const address = walletobject.selectedaddress;
Return {
Label: $ {Wallsname} ($ {Address}) ',,
Value: Address,
};
}
// Add Further Wallet -Pockets -Listen
document.getelementbyid ('add-more wallets'). Addeventlistener ('Click', () => {
Const selectedWallet = selectaccount (document.getelementbyid ('selected wallet'). Value);
// Go on with the transaction
});
Diploma
“Select your account”. If you follow these steps, you can tools and seamless experience to link several wallets with one account. Regardless of whether you build a new or existing project, metamask is an excellent choice for secure web3 wallet solutions.